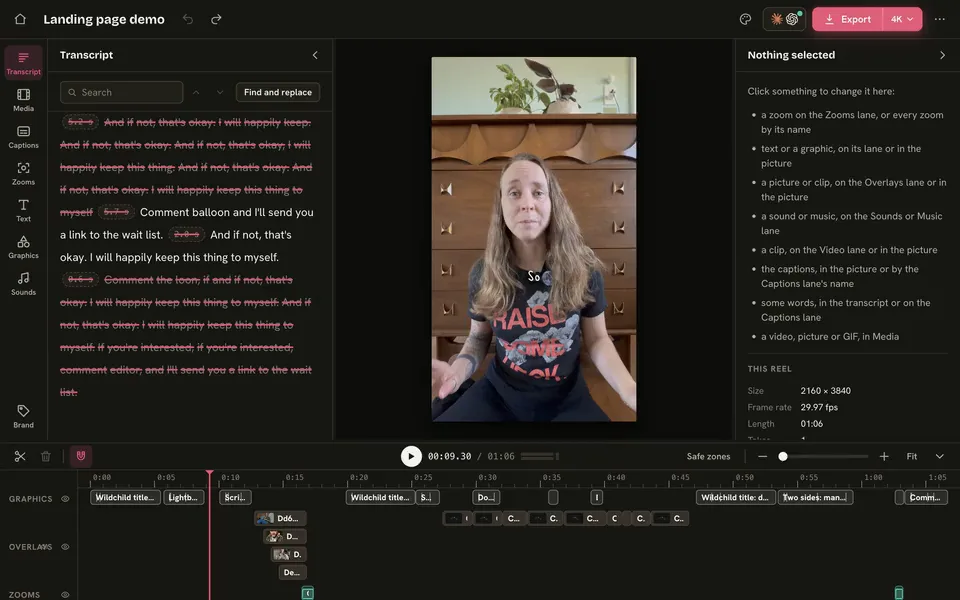
The timeline’s tracks, Simple view, themes and Yapp beside your chat.
Simple view: toolbars on the picture
You can close every panel and still change the things you change most. Click a text, graphic, card or the captions on the picture and its toolbar appears there.
Hide the left panel, the right panel and the timeline with the hide buttons in the editor (Hide the panel, Hide the timeline). Panels stay hidden until you show them again.
Click a text, graphic, card or the captions on the picture. A toolbar appears.
Choose More for the whole settings page, floating beside the picture. Drag it by its grip. Esc or Close shuts it.
The timeline is a stack of tracks, each holding one kind of thing. Whatever is on a higher track draws in front. Your video is on the main track, with the audio tracks under it.
Each row of the timeline is a track, with its name at the left. Above the main track sit Text, Graphics, Overlays (your cards), Effects, Filters, Adjust, Captions and Cutout of you tracks. A reel can have several tracks of one kind, in any order.
Screenshot coming soon
Tracks, top to bottom.
Higher tracks draw in front
The picture is drawn from the bottom up, so a title on a track above a card shows over the card. To change what is in front, see Move things between tracks. A filter, effect or adjustment changes everything on the tracks under its own: see Choose what a filter or effect changes.
The main track
The Main track holds your clips, cut from the transcript. It always stays at the bottom of the picture. Zooms and Moves ride on it as thin strips just above its clips: click a strip to pick it, then drag it or its ends. Transitions sit on its cuts.
Audio tracks
Sound effects and music sit on Audio tracks under the main track. Any audio track holds both, and their order changes nothing you hear.
The Captions track
Your captions are a track of their own, at the top when you start, so they draw in front of everything. Drag the Captions track lower to put a title or a card in front of them. Pressing any caption word and dragging moves the whole track; a click still picks the word. Its eye is the same switch as Show captions, and a click on its name opens the caption settings.
The Cutout of you track
Remove background adds a Cutout of you track straight over the main track. Anything on a track under it is behind you. See Remove background.
Tracks come and go
A new item goes on a track of its kind: text over graphics over cards, and a new filter or effect over your video but under your cards. If a cut brings two items together on one track, the later one moves onto a track of its own. A track left empty goes away, except the main and Captions tracks.
In a narrow window
Under 625 pixels wide, as in a narrow pane beside your chat, the names are short (Main, Cutout). Each track shows its eye (an audio track its speaker) and its lock only while it is on. The rest is under More.
Or ask your agent
You
Tell me what is on each track, top to bottom.
Move things between tracks
Drag a bar up or down onto another track, or between two tracks for a new one. Or use Layer: Bring forward, Send backward, Bring to front or Send to back. A whole track drags by its name.
Drag a bar
Drag a text, graphic, card, filter, effect or adjustment bar up or down. Its ghost follows the pointer, and the picture shows the reel as it would be.
Over a track of its kind with room, the track is outlined. Let go to put it there.
Between two tracks, above the top one, over a full track or over a track of another kind, a line marks a new track, such as New text track. Let go and the track opens there.
Clip coming soon
Dragging a bar to a new track.
Text, graphics, cards, filters, effects and adjustments stay above the main track, and sounds and music under it. A zoom stays on the main track, and a cutout on its own track. Let go off the timeline and nothing changes.
Drop from a panel
Dragging a tile from Text, Graphics, Effects, Filters, Adjust or Sounds, or a picture or clip from Media or your Mac, works the same way: it lands on the track under the pointer, or on a new track where the line shows. A filter, effect or adjustment let go on a clip or a card goes on that clip or card instead.
Layer
Right-click a text, graphic, card, filter, effect or adjustment bar, or find Layer on its page under Where it is:
Bring forward puts it on a new track just over the next track up.
Send backward puts it on a new track just under the next track down.
Bring to front puts it on a new track at the top.
Send to back puts it on a new track just over the main track, which is behind you when you have a cutout.
Each is off when the item is already at that end.
Move a whole track
Drag a track by its name, or by the grip at its left. A line marked Move the track here shows where it goes. Picture tracks move among the picture tracks and audio tracks among the audio tracks; the main track stays where it is. A track’s menu has the same four Layer commands for the whole track.
Or ask your agent
You
Move the title above the card.
Your agent can also move a whole track, or put something on a new track above or below another.
Lock, hide, mute or delete a track
Use the lock, eye and speaker beside a track’s name, or open More for its menu: Lock track, Hide track, Mute track, Track volume… and Delete track. Each is one undo step.
The buttons beside its name
Button
What it does
Lock
Nothing on the track can be picked, moved, trimmed, changed or deleted, and its row is hatched. Pressing anything on it says Track locked: unlock it to change what is on it.
Eye
Hides the track: it is left out of the preview and the export, and dimmed on the timeline. You can still change what is on it.
Speaker
Mutes the track. The main track and audio tracks have one, and an Overlays track while a card on it plays a clip with sound.
A note confirms each one, such as Track locked or Track hidden. Audio tracks have a lock and a speaker, but no eye.
The track’s menu
Hover a track’s name and choose More (⋯), or right-click the name:
Select all on track selects the track and opens its page.
Layer: Bring forward, Send backward, Bring to front and Send to back, for the whole track.
Lock track, Hide track and Mute track, ticked while on.
Track volume… on an audio track opens its page, with a Track volume slider from −60 to 20 dB. It adds to the volume of everything on the track.
Delete track deletes the track and everything on it. Its hint says what goes, such as 2 items, and the note that follows has Undo. It is off on a locked track.
Screenshot coming soon
A track’s menu.
The main track’s menu
The main track never moves and can’t be deleted. Its menu has Lock track, Hide track and Mute track, then Hide zooms (to compare with and without them) and Select every zoom while the reel has zooms, and Remove background. Locking the main track also stops cuts in the Transcript: The main track is locked: unlock it to cut words.
The track’s page
Click a track’s name to open its page in the right panel: what the track does, the Track switches (and Track volume on an audio track), Layer, what is On it, and its Place, such as 3rd of 11.
The Captions track
Hiding the Captions track turns Show captions off. Locking it keeps the captions’ style, emphasis and place, but word fixes, find and replace and cuts still work. Delete track on it takes the captions off the reel and keeps their style: turn Show captions on again to bring the track back at the top.
Or ask your agent
You
Lock the text track, and turn the audio track with the music down 6 dB.
Your agent asks before it unlocks a track you locked, and deletes a track only when you ask.
Change the theme: Light, Dark or Auto
Choose the Theme button (the palette) in the header, then Light, Dark or Auto. You can also dress Yapp Studio in a brand kit’s colors, or pick your own.
Choose Theme in the header (or View, then Theme in the menu bar).
Pick Light, Dark or Auto, which follows your Mac.
Pick a card: Yapp Studio, one of your kits, or Custom. Custom has color wells for Background, Accent and Secondary, and Start from a kit.
Screenshot coming soon
The Theme panel.
With Custom chosen, the background decides light or dark. If a color would make text hard to read, Yapp Studio adjusts it a little and tells you. The theme changes the app, never your video, and the preview’s frame stays black.
Or ask your agent
You
Put Yapp Studio in dark mode with my brand colors.
Edit beside your chat: Yapp in Claude and Codex
Ask your agent to work on a video and Yapp Studio opens in the pane next to the chat, in Claude’s and Codex’s desktop apps. You watch the edits land and edit by hand there too.
Start a chat in the Claude or Codex desktop app and say "Edit my project in Yapp Studio".
Your agent starts Yapp Studio in the background and opens the editor in the pane. If Claude asks whether the pane may use the address, choose Allow.
Edit by hand in the pane, or keep asking. It is your real project on your Mac.
Clip coming soon
Yapp beside the chat.
The pane’s menu
In the pane, ⋯ has Open in Yapp (shows the Mac window) and Quit. Export from the pane uses the usual Mac Export video box.
Narrow layouts
Wide (932 pixels and up): the full editor.
625 to 931 pixels: one side panel beside the preview.
Under 625 pixels: the preview on top, then the timeline, with short track names, then the panels as tabs.
Everything stays reachable at every width. The Mac window is unchanged.
Panels, undo and keyboard shortcuts
The rail on the left holds the panels. Undo and Redo name the step they will take back, and the keys you already know work.
The left rail, top to bottom: Transcript, Media, Captions, Zooms, Text, Graphics, Transitions, Effects, Filters, Adjust, Sounds, and Brand at the bottom. Choose the one already open to hide its panel.
The header has Home, the project name (click to rename), Undo and Redo (they say what they will undo), then buttons for reporting a bug, the theme, your agent, the Update pill, the export ring, Export and ⋯.
Keys
What they do
⌘Z⇧⌘Z
Undo, Redo
⌘E
Export
⌘O, ⌘N, ⌘W
Open, new project from a take, close project
⌘F
Search the transcript
⌘B or S
Split at the playhead
Space
Play and pause
J
Jump back 3 seconds and play, to hear the last bit again